> ## Documentation Index
> Fetch the complete documentation index at: https://developers.circle.com/llms.txt
> Use this file to discover all available pages before exploring further.
# Quickstart: Deploy a smart contract using bytecode
> Deploy smart contract bytecode using Circle Contracts
This quickstart walks you through deploying a smart contract using the compiled
bytecode and ABI using Circle Contracts.
Circle Contracts provides an API for deploying, exploring, and interacting with
smart contracts. The platform offers a powerful toolset for developers to build
decentralized applications and for businesses to transition onchain.
This guide can also be followed to deploy smart contracts on the other
[supported blockchains](/contracts/supported-blockchains) by changing the
`blockchain` parameter in your request. Additionally, you can deploy to Mainnet
by swapping out the Testnet API key for a Mainnet API key. See the
[Testnet vs Mainnet](/circle-mint/references/sandbox-and-testing#transition-to-production)
guide for more details.
## **Prerequisites**
Before you begin, ensure you've:
1. Created [an API key in the Circle Console](/contracts/create-api-key).
2. [Registered your Entity Secret](https://developers.circle.com/wallets/dev-controlled/register-entity-secret).
## **Step 1: Project setup**
Set up your local development environment and install the required dependencies.
### 1.1 Set up a new project
Create a new directory, navigate to it and initialize a new project with de1ault
settings
```shell NodeJS theme={null}
mkdir scp-bytecode-deploy
cd scp-bytecode-deploy
npm init -y
npm pkg set type=module
```
```shell Python theme={null}
mkdir scp-bytecode-deploy
cd scp-bytecode-deploy
python3 -m venv .venv
source .venv/bin/activate
```
### 1.2 Install dependencies
In the project directory, install the required dependencies. This guide uses
SDKs for Circle
[developer-controlled wallets](https://developers.circle.com/wallets/dev-controlled/create-your-first-wallet)
and [Contracts](https://developers.circle.com/contracts).
```ts NodeJS theme={null}
npm install @circle-fin/developer-controlled-wallets @circle-fin/smart-contract-platform
```
```py Python theme={null}
pip install circle-smart-contract-platform circle-developer-controlled-wallets
```
## Step 2: Create a wallet and fund it with testnet tokens
In this section, you will create a developer-controlled wallet with the SDK and
fund it with testnet USDC to pay for the gas fees needed to deploy the smart
contract. If you already have a developer-controlled wallet, skip to
[Step 3](#step-3:-compile-a-smart-contract).
### 2.1 Setup and run a create-wallet script
Import the developer-controlled wallets SDK and initialize the client. You will
require your API key and Entity Secret for this. Note that your API key and
Entity Secret are sensitive credentials. Do not commit them to Git or share them
publicly. Store them securely in environment variables or a secrets manager.\
Developer-controlled wallets are created in a wallet set, which is the source
from which individual wallet keys are derived.
```typescript NodeJS theme={null}
import { initiateDeveloperControlledWalletsClient } from "@circle-fin/developer-controlled-wallets";
const client = initiateDeveloperControlledWalletsClient({
apiKey: "",
entitySecret: "",
});
// Create a wallet set
const walletSetResponse = await client.createWalletSet({
name: "WalletSet 1",
});
console.log("Created WalletSet", walletSetResponse.data?.walletSet);
// Create a wallet on Arc Testnet
const walletsResponse = await client.createWallets({
blockchains: ["ARC-TESTNET"],
count: 1,
walletSetId: walletSetResponse.data?.walletSet?.id ?? "",
});
console.log("Created Wallets", walletsResponse.data?.wallets);
```
```python Python theme={null}
from circle.web3 import utils
from circle.web3 import developer_controlled_wallets
client = utils.init_developer_controlled_wallets_client(
api_key="",
entity_secret=""
)
wallet_sets_api = developer_controlled_wallets.WalletSetsApi(client)
wallets_api = developer_controlled_wallets.WalletsApi(client)
# Create a wallet set
wallet_set = wallet_sets_api.create_wallet_set(
developer_controlled_wallets.CreateWalletSetRequest.from_dict({
"name": "Wallet Set 1"
})
)
# Create a wallet on Arc Testnet
wallet = wallets_api.create_wallet(
developer_controlled_wallets.CreateWalletRequest.from_dict({
"blockchains": ["ARC-TESTNET"],
"count": 1,
"walletSetId": wallet_set.data.wallet_set.actual_instance.id
})
)
```
If you are not using the developer-controlled wallets SDK, you can call the API
directly as well. You will need to make 2 requests, one to create the wallet set
and one to create the wallet. Make sure to replace the
[entity secret ciphertext](https://developers.circle.com/wallets/dev-controlled/entity-secret-management#entity-secret-ciphertext)
and idempotency key.
```shell theme={null}
curl --request POST \
--url https://api.circle.com/v1/w3s/developer/walletSets \
--header 'Authorization: Bearer ' \
--header 'Content-Type: application/json' \
--data '
{
"entitySecretCiphertext": "",
"idempotencyKey": "",
"name": "WalletSet 1"
}
'
```
The wallet set ID is required for creating the wallet.
```shell theme={null}
curl --request POST \
--url https://api.circle.com/v1/w3s/developer/wallets \
--header 'Authorization: Bearer ' \
--header 'Content-Type: application/json' \
--data '
{
"idempotencyKey": "",
"blockchains": [
"ARC-TESTNET"
],
"entitySecretCiphertext": "",
"walletSetId": "",
"accountType": "EOA",
"count": 1,
]
}
'
```
You should end up with a new developer-controlled wallet, and the response will
look something like this:
```json theme={null}
[
{
"id": "a2f67c91-b7e3-5df4-9c8e-42bbd51a9fcb",
"state": "LIVE",
"walletSetId": "5c3e9f20-8d4b-55a1-a63b-c21f44de8a72",
"custodyType": "DEVELOPER",
"refId": "",
"name": "",
"address": "0x9eab451f27dca39bd3f5d76ef28c86cc0b3a72df",
"blockchain": "ARC-TESTNET",
"accountType": "EOA",
"updateDate": "2025-11-07T01:35:03Z",
"createDate": "2025-11-07T01:35:03Z"
}
]
```
### 2.3 Fund the wallet with test USDC
Obtain some testnet USDC for executing transactions like making transfers and
paying gas fees for those transactions. Circle's
[Testnet Faucet](https://faucet.circle.com/) provides testnet USDC and can be
used once per hour to obtain additional USDC.
### 2.4 Check the wallet's balance
You can check your wallet's balance from the
[Developer Console](https://console.circle.com/wallets/dev/wallets) or
programmatically by making a request to
[`GET /wallets/{id}/balances`](https://developers.circle.com/api-reference/wallets/developer-controlled-wallets/list-wallet-balance)
with the wallet ID of the wallet you created.
```ts NodeJS theme={null}
const response = await client.getWalletTokenBalance({
id: "",
});
```
```py Python theme={null}
try:
wallet_balance = wallets_api.list_wallet_balance(id="")
print(wallet_balance.json())
except developer_controlled_wallets.ApiException as e:
print("Exception when calling WalletsApi->list_wallet_balance: %s\n" % e)
```
```shell cURL theme={null}
curl --request GET \
--url 'https://api.circle.com/v1/w3s/wallets/{}/balances' \
--header 'accept: application/json' \
--header 'authorization: Bearer '
```
## **Step 3: Compile a smart contract**
In this section, you will compile and deploy a minimal smart contract for an
onchain payment inbox using Contracts. Users pay by approving and depositing
USDC, payments are recorded via events, and the owner can withdraw the
accumulated balance.
This contract is intentionally minimal and for learning purposes only. Smart
contracts that manage real funds typically require additional security
patterns, testing, and audits, and often rely on community-reviewed libraries
such as [OpenZeppelin](https://www.openzeppelin.com/).
```solidity theme={null}
// SPDX-License-Identifier: MIT
pragma solidity ^0.8.20;
interface IERC20 {
function transfer(address to, uint256 amount) external returns (bool);
function transferFrom(address from, address to, uint256 amount) external returns (bool);
function balanceOf(address account) external view returns (uint256);
}
contract MerchantTreasuryUSDC {
address public immutable owner;
IERC20 public immutable usdc;
event PaymentReceived(address indexed sender, uint256 amount);
event FundsWithdrawn(address indexed to, uint256 amount);
constructor(address _owner, address _usdc) {
require(_owner != address(0), "Invalid owner");
require(_usdc != address(0), "Invalid USDC");
owner = _owner;
usdc = IERC20(_usdc);
}
function deposit(uint256 amount) external {
require(amount > 0, "Invalid amount");
bool ok = usdc.transferFrom(msg.sender, address(this), amount);
require(ok, "USDC transferFrom failed");
emit PaymentReceived(msg.sender, amount);
}
function withdraw() external {
require(msg.sender == owner, "Unauthorized");
uint256 amount = usdc.balanceOf(address(this));
require(amount > 0, "No funds");
bool ok = usdc.transfer(owner, amount);
require(ok, "USDC transfer failed");
emit FundsWithdrawn(owner, amount);
}
function balance() external view returns (uint256) {
return usdc.balanceOf(address(this));
}
}
```
* `constructor(address _owner)`: Sets the treasury owner and the USDC token
address at deployment
* `receive() (payable)`: Transfers approved USDC from the caller into the
contract and emits `PaymentReceived(sender, amount)`
* `withdraw()`: Allows only the owner to withdraw the entire USDC balance; emits
`FundsWithdrawn(to, amount)`
* `balance() (view)`: Returns the contract's current USDC balance
### 3.1 Obtain ABI and bytecode from Remix IDE
1. Open the [Remix IDE](https://remix.ethereum.org/).
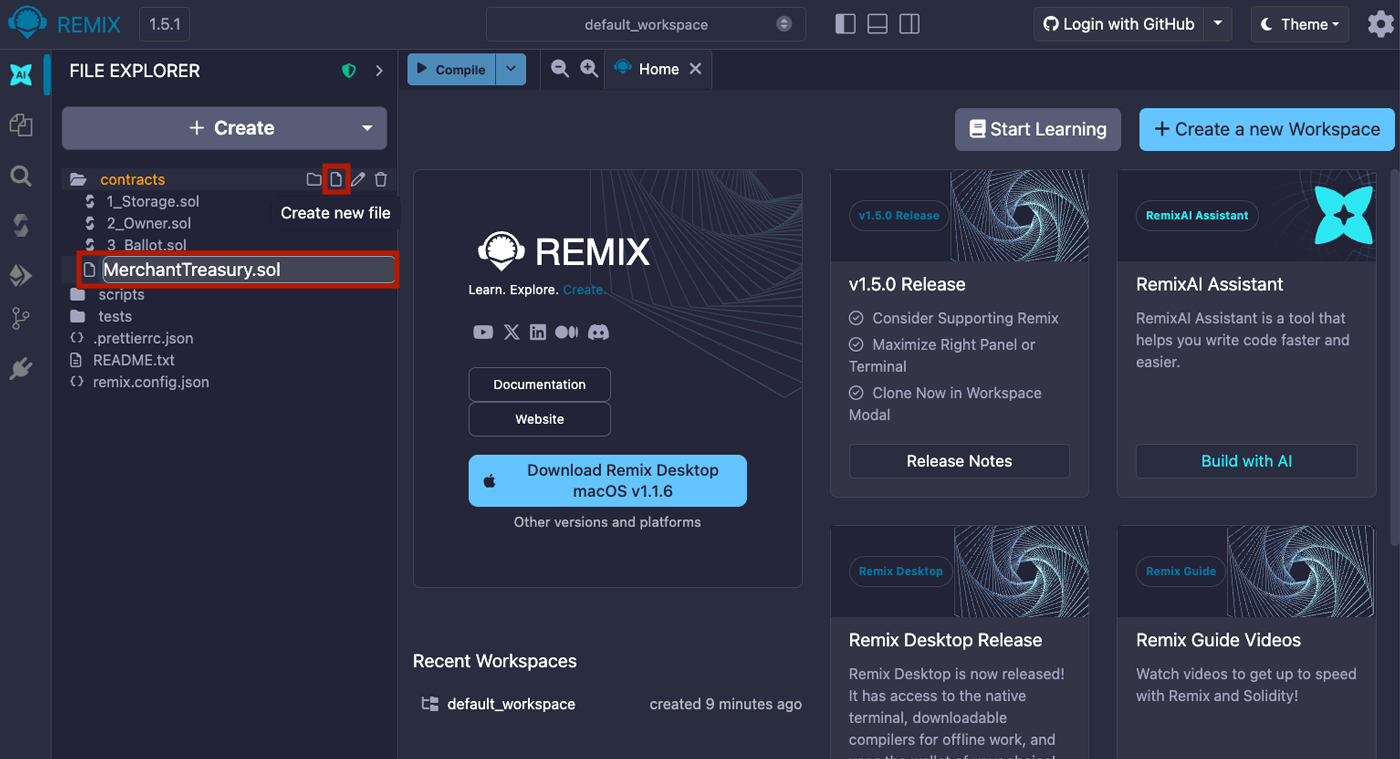
2. Create a new file in the contracts folder called `MerchantTreasury.sol`.
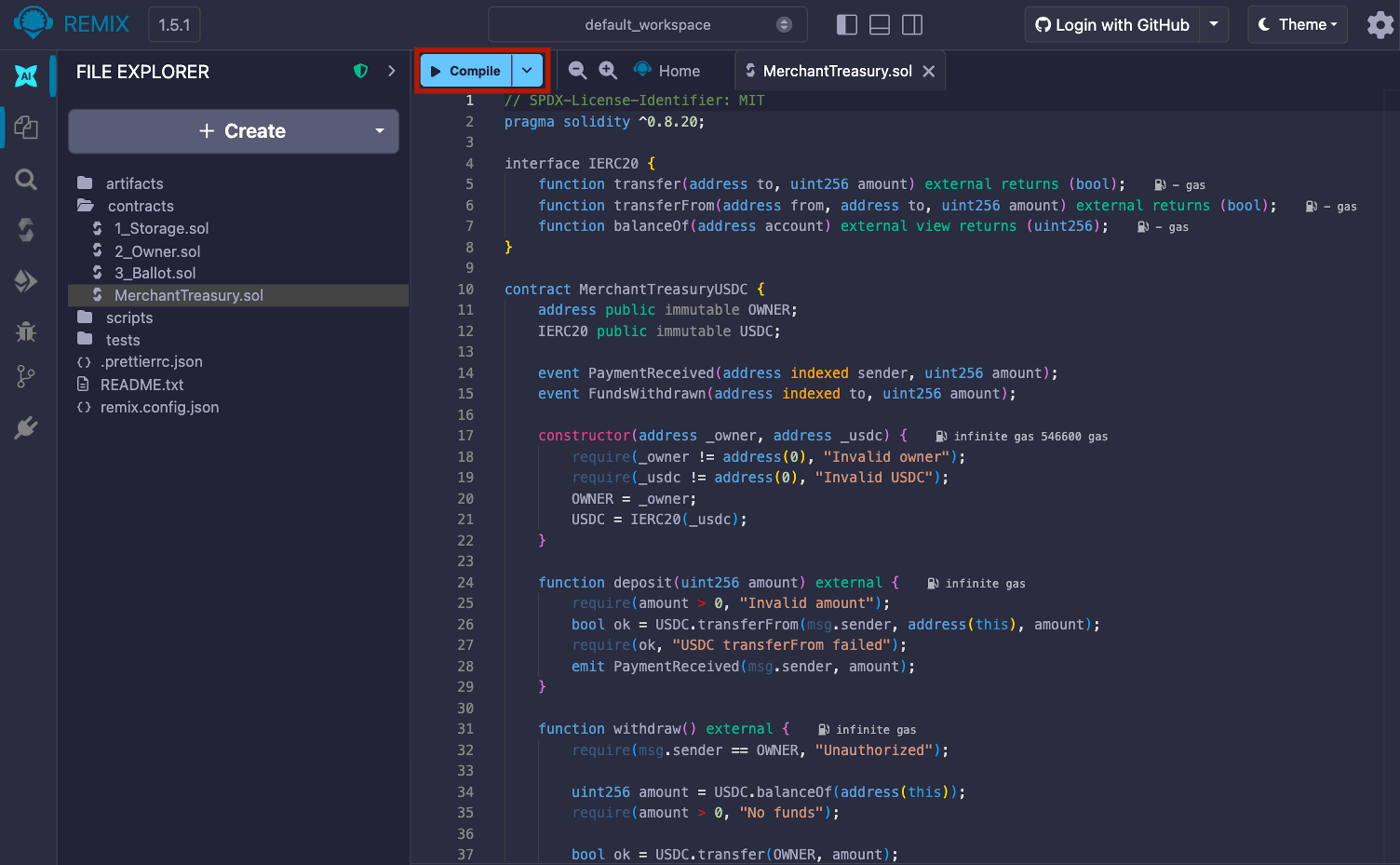
 3. Copy and paste the Solidity code into the file, then click on the Compile
button.
3. Copy and paste the Solidity code into the file, then click on the Compile
button.
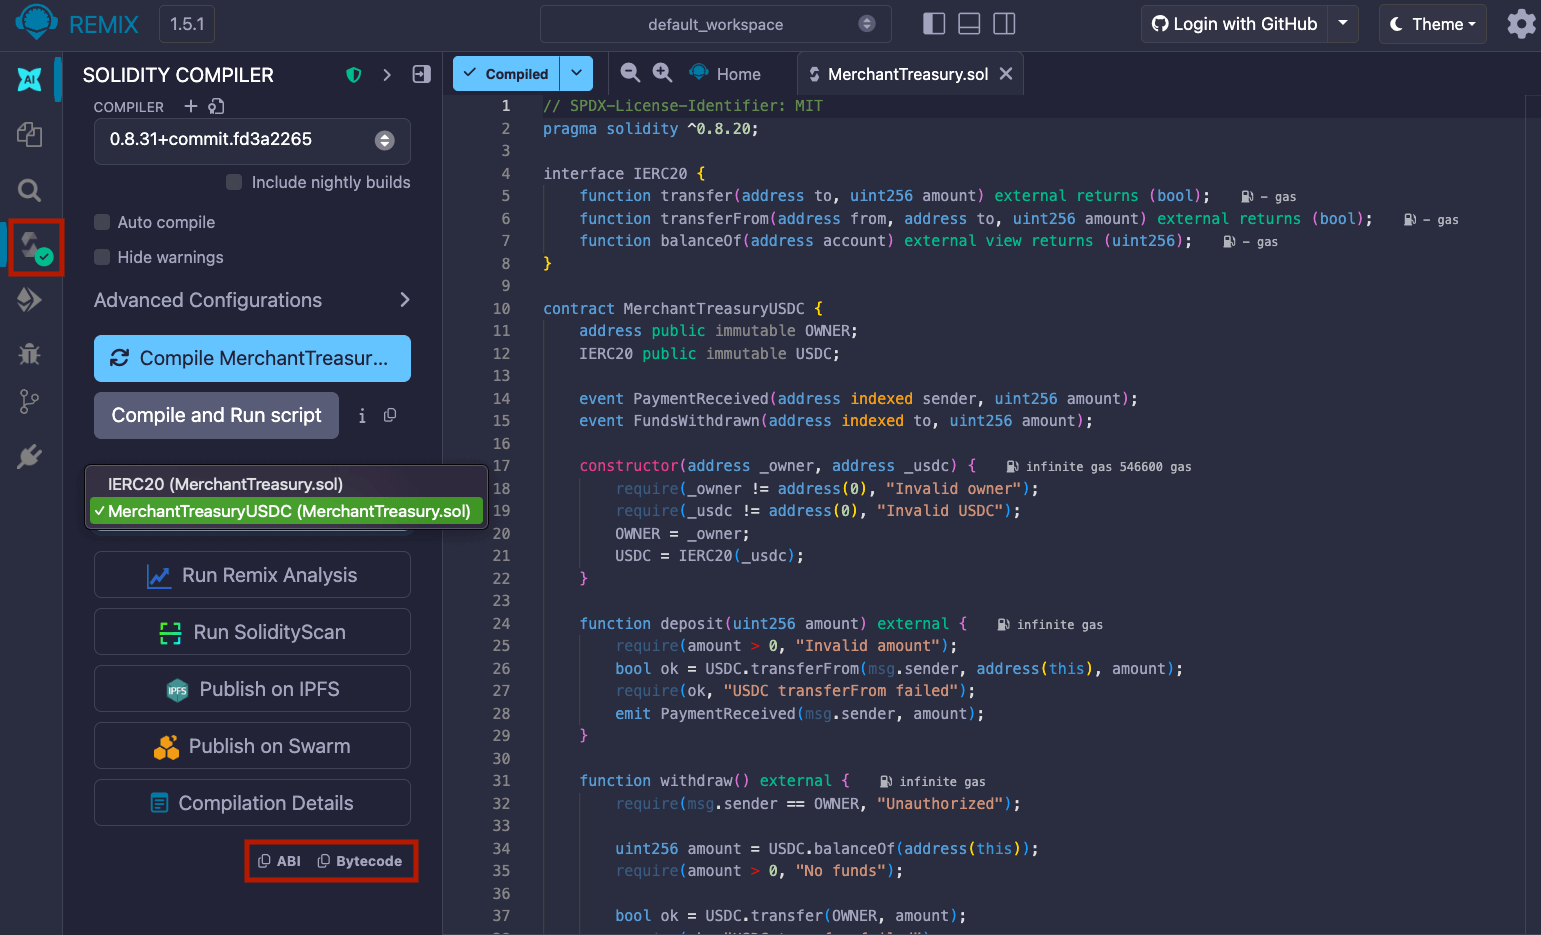
 4. Navigate to the Solidity Compiler tab from the left sidebar. Under Contracts,
make sure MerchantTreasuryUSDC (Merchant Treasury.sol) is selected. You
should see the option to copy the ABI and Bytecode. These values will be used
in the next step.
4. Navigate to the Solidity Compiler tab from the left sidebar. Under Contracts,
make sure MerchantTreasuryUSDC (Merchant Treasury.sol) is selected. You
should see the option to copy the ABI and Bytecode. These values will be used
in the next step.
 1. The compiler output is available under Compilation Details. For more
information on the Solidity compiler's outputs, see [using the
compiler](https://docs.soliditylang.org/en/stable/using-the-compiler.html).
2. The Application Binary Interface (ABI) is the standard way to interact
with contracts on an EVM from outside the blockchain and for
contract-to-contract interaction.
## Step 4: Deploy the smart contract
In this section, you will deploy the smart contract on Arc using the contract's
ABI and bytecode, which you have compiled in the previous step.
Import and initialize the Contracts SDK, then copy the ABI JSON and raw bytecode
over from Remix. Note that you need to append `0x` to the raw bytecode.
The `constructorParameters` correspond to the arguments encoded in the
contract's deployment bytecode. Since different contracts define different
constructors, these parameters vary based on the specific contract being
deployed. For this contract, the parameters are the wallet address of the owner
and the USDC token contract address on Arc Testnet.
```typescript NodeJS theme={null}
import { initiateSmartContractPlatformClient } from "@circle-fin/smart-contract-platform";
const client = initiateSmartContractPlatformClient({
apiKey: "",
entitySecret: "",
});
const abiJson = PASTE_YOUR_ABI_JSON_HERE;
const bytecode = "0xPASTE_YOUR_BYTECODE_HERE";
const response = await client.deployContract({
name: "MerchantTreasury Contract",
description:
"Contract to receive payments and allow an owner to withdraw funds",
blockchain: "ARC-TESTNET",
walletId: "",
abiJson: JSON.stringify(abiJson, null, 2),
bytecode: bytecode,
constructorParameters: [
"", // Initial owner of the contract
"0x3600000000000000000000000000000000000000", // USDC contract address on Arc Testnet
],
fee: { type: "level", config: { feeLevel: "MEDIUM" } },
});
console.log(response.data);
```
```python Python theme={null}
from circle.web3 import smart_contract_platform
from circle.web3 import utils
client = utils.init_smart_contract_platform_client(
api_key="",
entity_secret=""
)
api_instance = smart_contract_platform.DeployImportApi(client)
abi_json_str = """PASTE_YOUR_ABI_JSON_HERE"""
abi = json.loads(abi_json_str)
abi_json = json.dumps(abi)
request = smart_contract_platform.ContractDeploymentRequest.from_dict({
"name": 'MerchantTreasury Contract',
"description": 'Contract to receive payments and allow an owner to withdraw funds',
"blockchain": 'ARC-TESTNET',
"walletId": '',
"abiJson": abi_json,
"bytecode": "0xPASTE_YOUR_BYTECODE_HERE",
"constructorParameters": ['', '0x360000000000000000000000000000000000000'], # owner address and USDC contract address on Arc Testnet
"feeLevel": 'MEDIUM',
})
response = api_instance.deploy_contract(
contract_deployment_request=request
)
print(response.json())
```
```shell cURL theme={null}
curl --request POST \
--url https://api.circle.com/v1/w3s/contracts/deploy \
--header 'Authorization: Bearer ' \
--header 'Content-Type: application/json' \
--data '
{
"idempotencyKey": "",
"name": "MerchantTreasury Contract",
"description": "Contract to receive payments and allow an owner to withdraw funds",
"walletId": "",
"blockchain": "ARC-TESTNET",
"abiJson": "PASTE_YOUR_ABI_JSON_HERE",
"bytecode": "0xPASTE_YOUR_BYTECODE_HERE",
"constructorParameters": ["", "0x36000000000000000000000000000000000000"],
"feeLevel": "MEDIUM",
"entitySecretCiphertext": ""
}
'
```
After running the script successfully, you should receive a response object that
looks like this:
```shell theme={null}
{
contractId: 'xxxxxxxx-xxxx-7xxx-8xxx-xxxxxxxxxxxx',
transactionId: 'xxxxxxxx-xxxx-5xxx-axxx-xxxxxxxxxxxx'
}
```
You can check the status of the deployment from the
[Developer Console](https://console.circle.com/smart-contracts/contracts) or run
`getContract` from the SDK directly.
```ts NodeJS theme={null}
const response = await circleContractSdk.getContract({
id: "",
});
```
```py Python theme={null}
api_instance = smart_contract_platform.ViewUpdateApi(client)
response = api_instance.get_contract(id="")
print(response.json())
```
```shell cURL theme={null}
curl --request GET \
--url https://api.circle.com/v1/w3s/contracts/{CONTRACT_ID} \
--header 'Authorization: Bearer '
```
Once your contract is deployed, you will be able to interact with it from your
application and mint new NFTs with it. You should be able to see it from the
console and on the [Arc Testnet Explorer](https://testnet.arcscan.app/).
1. The compiler output is available under Compilation Details. For more
information on the Solidity compiler's outputs, see [using the
compiler](https://docs.soliditylang.org/en/stable/using-the-compiler.html).
2. The Application Binary Interface (ABI) is the standard way to interact
with contracts on an EVM from outside the blockchain and for
contract-to-contract interaction.
## Step 4: Deploy the smart contract
In this section, you will deploy the smart contract on Arc using the contract's
ABI and bytecode, which you have compiled in the previous step.
Import and initialize the Contracts SDK, then copy the ABI JSON and raw bytecode
over from Remix. Note that you need to append `0x` to the raw bytecode.
The `constructorParameters` correspond to the arguments encoded in the
contract's deployment bytecode. Since different contracts define different
constructors, these parameters vary based on the specific contract being
deployed. For this contract, the parameters are the wallet address of the owner
and the USDC token contract address on Arc Testnet.
```typescript NodeJS theme={null}
import { initiateSmartContractPlatformClient } from "@circle-fin/smart-contract-platform";
const client = initiateSmartContractPlatformClient({
apiKey: "",
entitySecret: "",
});
const abiJson = PASTE_YOUR_ABI_JSON_HERE;
const bytecode = "0xPASTE_YOUR_BYTECODE_HERE";
const response = await client.deployContract({
name: "MerchantTreasury Contract",
description:
"Contract to receive payments and allow an owner to withdraw funds",
blockchain: "ARC-TESTNET",
walletId: "",
abiJson: JSON.stringify(abiJson, null, 2),
bytecode: bytecode,
constructorParameters: [
"", // Initial owner of the contract
"0x3600000000000000000000000000000000000000", // USDC contract address on Arc Testnet
],
fee: { type: "level", config: { feeLevel: "MEDIUM" } },
});
console.log(response.data);
```
```python Python theme={null}
from circle.web3 import smart_contract_platform
from circle.web3 import utils
client = utils.init_smart_contract_platform_client(
api_key="",
entity_secret=""
)
api_instance = smart_contract_platform.DeployImportApi(client)
abi_json_str = """PASTE_YOUR_ABI_JSON_HERE"""
abi = json.loads(abi_json_str)
abi_json = json.dumps(abi)
request = smart_contract_platform.ContractDeploymentRequest.from_dict({
"name": 'MerchantTreasury Contract',
"description": 'Contract to receive payments and allow an owner to withdraw funds',
"blockchain": 'ARC-TESTNET',
"walletId": '',
"abiJson": abi_json,
"bytecode": "0xPASTE_YOUR_BYTECODE_HERE",
"constructorParameters": ['', '0x360000000000000000000000000000000000000'], # owner address and USDC contract address on Arc Testnet
"feeLevel": 'MEDIUM',
})
response = api_instance.deploy_contract(
contract_deployment_request=request
)
print(response.json())
```
```shell cURL theme={null}
curl --request POST \
--url https://api.circle.com/v1/w3s/contracts/deploy \
--header 'Authorization: Bearer ' \
--header 'Content-Type: application/json' \
--data '
{
"idempotencyKey": "",
"name": "MerchantTreasury Contract",
"description": "Contract to receive payments and allow an owner to withdraw funds",
"walletId": "",
"blockchain": "ARC-TESTNET",
"abiJson": "PASTE_YOUR_ABI_JSON_HERE",
"bytecode": "0xPASTE_YOUR_BYTECODE_HERE",
"constructorParameters": ["", "0x36000000000000000000000000000000000000"],
"feeLevel": "MEDIUM",
"entitySecretCiphertext": ""
}
'
```
After running the script successfully, you should receive a response object that
looks like this:
```shell theme={null}
{
contractId: 'xxxxxxxx-xxxx-7xxx-8xxx-xxxxxxxxxxxx',
transactionId: 'xxxxxxxx-xxxx-5xxx-axxx-xxxxxxxxxxxx'
}
```
You can check the status of the deployment from the
[Developer Console](https://console.circle.com/smart-contracts/contracts) or run
`getContract` from the SDK directly.
```ts NodeJS theme={null}
const response = await circleContractSdk.getContract({
id: "",
});
```
```py Python theme={null}
api_instance = smart_contract_platform.ViewUpdateApi(client)
response = api_instance.get_contract(id="")
print(response.json())
```
```shell cURL theme={null}
curl --request GET \
--url https://api.circle.com/v1/w3s/contracts/{CONTRACT_ID} \
--header 'Authorization: Bearer '
```
Once your contract is deployed, you will be able to interact with it from your
application and mint new NFTs with it. You should be able to see it from the
console and on the [Arc Testnet Explorer](https://testnet.arcscan.app/).